As of today, Snapbridge is Nikon’s solution for transferring images wirelessly from their cameras to a mobile phone. So far, reactions of users are generally average. Main complaints revolve around unreliable connections, and a somewhat unintuitive workflow as well as insufficient documentation.
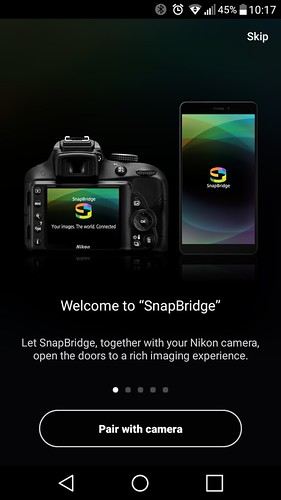 Snapbridge’s welcome screen
Actually, Snapbridge can work well if you understand the underlying technology and the design approach. The problem is that these features have not been organized into simple, understandable workflows for end users. The Snapbridge system feels like something that was created by engineers, but lacking a manager with the autonomy and resources to meticulously dictate how the solution’s UI and workflows should be intuitively designed for end-users. Hence Snapbridge in its current state feels like an engineer’s product. I will say that the engineers were really sincere in delivering a working solution, but it might require an engineer’s way of thinking to unveil the possibilities that Snapbridge is capable of.
 Snapbridge’s features are actually quite OK, but design of user workflows needs improvement.
Hence I have written this article of guide and tips to Nikon Snapbridge. This is not a user manual, and I will not have step-by-step guides for how to make connections and perform certain actions. The Snapbridge UI is actually intuitive enough in various aspects and I see no point in replicating identical information here. What I wish to provide are recommendations which allow users to understand how to use Snapbridge in constructive and practical ways that minimizes (or eliminates) frustration.
(All my findings come from working with an Android application. I will not guarantee the accuracy of this information for iOS users. From my limited information in 2017, the iOS ecosystem is much more troublesome than Android’s when it comes to Snapbridge reliability)
Update 12 June 2018: Amended recommendation (10) and added recommendation (11).
1. Camera settings: Should “airplane mode” be enabled?
Enabling airplane mode shuts down all Bluetooth and WiFi connections. For all practical purposes it could be renamed “Turn on/off Snapbridge”.
Solution: Just enable airplane mode if you do not want any connection with your phone. Disable it when you want to connect. Saving battery life is always a good thing, so leave airplane mode enabled whenever you do not need the connectivity to preserve battery life.
2. Camera settings: Should I change the Bluetooth and WiFi settings?
These settings are overwritten and managed by the smartphone app every time you make a fresh connection between the camera and Snapbridge app. There is no need to touch them as the Snapbridge system is quite competent in managing them automatically. Which begs the question – why are they there? Probably for engineers and geeks who want to play around with the connection options.
Solution: I recommend you don’t touch them at all unless you are a geek and wants to experiment with stuff.
3. Camera settings: What about “Send to smart device (auto)”?
If enabled, every new JPEG image you take will have a 2MP copy transferred to your phone when it connects with the camera. If your camera is configured to produce RAW images only nothing will be transferred.
Solution: Switch this on if you want a 2MP copy of every image you take to be transferred to your phone. You may or may not want this to happen.
Note that every time you establish a new connection between the camera and phone, this option will be switched on automatically. So make sure to check and switch this option off if you do not want this behaviour.
4. Establishing the Bluetooth connection is clunky
Bluetooth has been implemented in mobile phones for a long, long time. I do not find them overly reliable in the days of 2MP phone cameras, and I still do not find them reliable today. I get all kinds of reliability issues connecting Bluetooth devices – iOS to Android, Android to Windows, iOS to Windows. Think about it – Bluetooth’s pairing workflow is actually clunky compared to the connection convenience and spontaneity of WiFi and 3G/4G/LTE.
Solution: That is just the way Bluetooth behaves. There is nothing we can do about it. Understanding this will reduce some user anxiety when they wonder if something is wrong with either their camera or phone.
In Nikon’s case, they could consider implementing WiFi-Direct as an option for users who are willing to forgo a WiFi connection and pay the cost of slightly increased battery drain to connect directly. WiFi-Direct is actually already implemented for browsing the camera’s storage, direct download from camera storage and remote control. But we have to go through the step of connecting via Bluetooth first to get here.
 WiFi Direct is actually implemented for browsing camera storage and remote control, but not for establishing initial pairing.
5. Image transfer seems to have paused
There are power-saving features built into both the Snapbridge app and the camera. When the camera goes to sleep, image transfer may pause. I have even seen a connection process pause due to the camera going to sleep.
Solution: To resume image transfer, just make sure the Smartphone app is running and “wake up” your camera with a shutter half-press. It is actually quite simple.
6. Bluetooth connection lost or unable to connect
The phone and camera are disconnected and unable to re-establish their Bluetooth connection. Welcome to Bluetooth realities I mentioned earlier in (4).
Solution: Just “forget” the existing paired connection. Then run through the re-connection process. Works every time. As a matter of habit I manually “forget” the pairing every time I want to stop using Snapbridge.
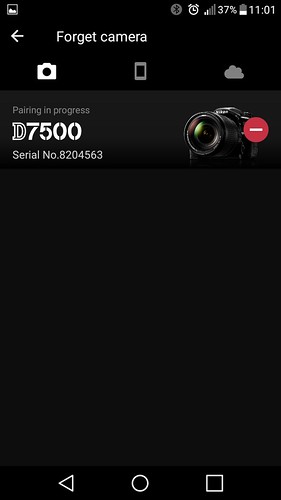 “Forget” the existing connection if you have persistent re-connection problems or want to exit Snapbridge.
7. How to have copies of all new photos be transferred to the phone?
This is the behaviour of smartphone cameras. Out of a 100 pictures you take with a smartphone, there may only be a few pictures you want to keep or share. But hey they are all there in your phone’s storage and you have the flexibility to deal with them later as you see fit.
Solution: Snapbridge already does this by default. Just run through the normal Snapbridge connection process and leave all the options as they are at default. Every time there is a new pairing, all the options on the camera and Snapbridge app default to uploading 2MP copies of every new JPEG image you take automatically.
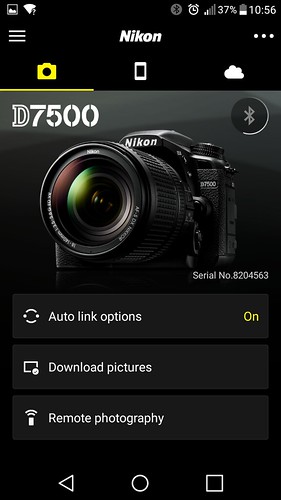
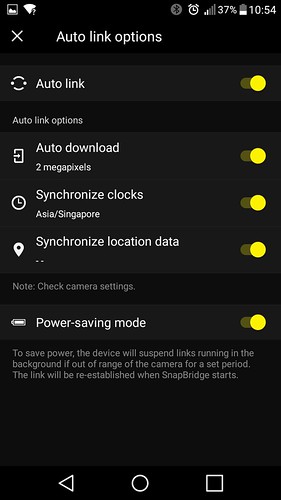 What the settings for a fresh connection look like. The defaults are good. I recommend them to be unchanged.
8. How to have copies of only photos I select be transferred to the phone?
This is the discerning photographer who does not want copies of every image to be transferred to the smartphone. This is easier than you think. Follow the following steps.
A. It actually does not matter whether you establish Snapbridge connection first or not. Really.
B. Ensure the camera option “Send to smart device (auto)” is set to “off”.
C. Just take pictures. 🙂
D. You want to transfer 2MP copies of some pictures you took. When reviewing the image on the camera’s LCD, press the “i” button on the camera, then select “send to smart device” in the pop-up menu that appears.
E. If Snapbridge connection is already established, the images you flagged in step (D) will be automatically transferred. If Snapbridge connection is not established, the flagged images will be transferred the next time a connection is made.
F. Read through A-E again and realize how unbelievably simple this is. :O
9. I want new images to be tagged with GPS coordinates, but do not want to automatically transfer every image I take to my phone
If you configured Snapbridge in (7) to transfer every image and did not change the default settings, every new image taken are automatically tagged with GPS coordinates. But if you do not want Snapbridge to transfer any image, but still want your images to be GPS-tagged?
Solution:
A. Establish a Snapbridge connection. Leave the Snapbridge app options at their default values as shown in (7).
B. Ensure the camera option “Send to smart device (auto)” is set to “off”.
C. Just take pictures. 🙂
D. That’s it. Every new image you take will be tagged with GPS coordinates. Read through A-C again and realize how unbelievably simple this is. :O
If you want greater GPS accuracy, there is a GPS accuracy setting in the Snapbridge app. By default accuracy is set to “medium”. Setting this to “high” obviously increases accuracy at the cost of battery life.
10. I want new images to be tagged with GPS coordinates, and I want to only transfer images I select to my phone
For the most discerning photographers who only want the best to be on their phone.
Solution: From (9), follow steps A-C. Then from (8), follow steps D-E. Done! The full details are,
A. Establish a Snapbridge connection. Leave the Snapbridge app options at their default values as shown in (7).
B. Ensure the camera option “Send to smart device (auto)” is set to “off”.
C. Just take pictures. 🙂
D. You want to transfer 2MP copies of some pictures you took. When reviewing the image on the camera’s LCD, press the “i” button on the camera, then select “send to smart device” in the pop-up menu that appears.
E. If Snapbridge connection is already established, the images you flagged in step (D) will be automatically transferred. If Snapbridge connection is not established, the flagged images will be transferred the next time a connection is made.
F. Done!
11. Switching off the camera while using Snapbridge is a bad idea, right?
Solution: Right. 😉 It also depends on you working preferences. Some of us instinctively switch off our camera when we are moving from one shooting scene to another. Obviously once you do that GPS coordinates do not get transferred, and when you do switch your camera on to take pictures, it will have to go to the hassle of re-connecting with your phone in the background.
Fortunately DSLRs have phenomenal battery life so you should be able to just leave a fully charged Nikon camera switched on the whole day while you are out shooting.
Oh yes. Obviously switching off your phone, or taking it a long distance away from your Snapbridge-connected camera has the same effect.
I will update this guide if I get more questions. Meanwhile, keep shooting and have fun. 😀 -WY

One thought on “Guide And Tips For Nikon Snapbridge”