Updated 29 April 2018 regarding recommendation for colour moire reduction.
Updated 2 August 2017 for recommendation about colour noise reduction. Clarified recommendations for colour profiles. Revised grammar.
Updated 22 June 2017 for information about astro noise reduction.
Updated 2 December 2016 for revised recommendations.
Updated 25 November 2016 to include reader observations and suggestions. Also included amended recommendations for noise reduction.
Updated on 5 October 2016 to include more details about the Picture Controls and adjust some grammar.
Capture NX-D is a great RAW converter for Nikon NEFs, no matter how you feel about its in-sufficiency for everything else. For those initial steps of detail extraction, colour interpretation, global exposure adjustment, and noise reduction – it is a great tool. I have spent nearly two years experimenting with the various RAW conversion tools – ACR, Capture One Pro, Photo Ninja, DXO OP, etc. Against all these paid options, NX-D performs surprisingly well. It is especially good at colour reproduction, where none of the competition could quite get the kind of accurate true-to-life colours as NX-D could. Of course, I should emphasize that realistic colours does not automatically mean it looks good to everyone! It really boils down to a matter of preference. Personally I find it easier to perform my edits on a well-exposed image with a neutral colour palette. I use NX-D to produce a globally exposure-adjusted, colour-corrected, noise-corrected, high quality 16-bit TIFF to feed into other post-processing applications that are better for detailed adjustments, such as Lightroom. Use the right tool for the job.
However as I have mentioned earlier, NX-D is not user-friendly and insufficient in many aspects. So here are some tips that could help get that RAW conversion part done.
1. Check colour space setting
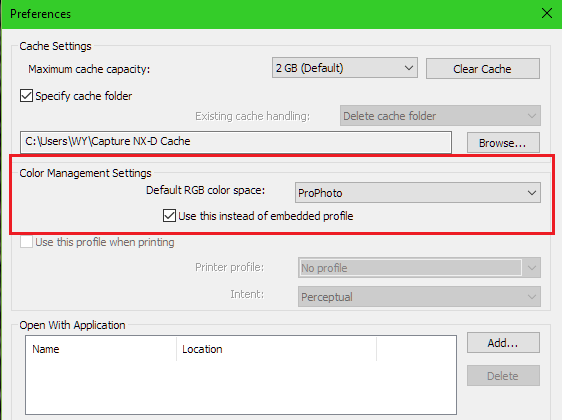
NX-D will default to exporting in the colour space your image is set to in-camera. I have no idea if it will also work within that colour space, but decided not to take the risk. If you want the exported TIFF to be in ProPhotoRGB, remember to set this in NX-D’s preferences. Image thumbnails may end up being displayed with wrong colours, but the image you are editing is displayed correctly, and it will export to ProPhotoRGB.
2. Change values in discrete increments
See those sliders in NX-D? NEVER DRAG THEM TO SEE HOW THEY AFFECT THE IMAGE. THIS WILL RESULT IN SUPER-SLOW PERFORMANCE. Change values in discrete increments or typing in the new values with a keyboard. Following this simple rule improves your experience by 1,000%.
3. NX-D is NOT “not sharp”
NX-D generates a lower resolution fit-to-window preview image, so some users mistake it as being “less sharp”. Magnify to 100% and you will see that it renders as much detail as other RAW converters. This is not unique to NX-D. Past versions of On1 Photo Suite over-sharpens the fit-to-window image, while Alien Skin Exposure renders an even lower-resolution preview image.
4. Enable Axial Colour Aberration Correction
Enable this and leave it at 50%. You can pull it up to 100%, where it works shockingly well in a side-by-side comparison with DXO Optics Pro. However I have seen some examples where pushing this over 50% starts graying-out legitimate magentas and reds in an image. So I’ll leave it at 50% unless you are confident it will not cause degradation. I’ll happily push this to 100% in images where I know has negligible risk – identifying them takes a little bit of experience though.
5. Use the Picture Control Styles
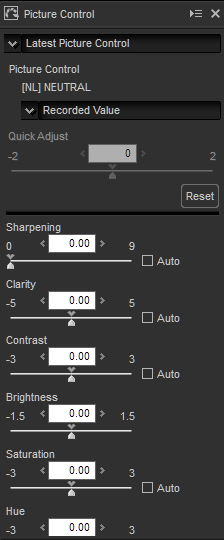
Fact: Canon and Nikon’s JPEG engines are good enough that some photographers only use them. They need to be good because event, sports and wedding photographers do not have the time to process every RAW file they shoot. Indeed, I find Nikon’s Picture Control styles very useful for quickly getting a look close to what you are after. In addition, the results are relatively neutral, so you hardly get the uncomfortable feel that the software is imposing some corny or over-abused aesthetic on your work. You can also tweak the result to suit your own tastes with the Picture Control sliders. Here are a few styles that I like to use:
– Flat. Really flat, but helps to lift the shadows substantially. This is useful for when you want the most neutral and evenly-exposed TIFF possible to start with. I use this most of the time.
– Neutral. More contrast and slightly more colour punch than Flat. This is useful when you feel that Standard has too much contrast but do not want to go to Flat.
Note that other than “flat” and “neutral”, the other profiles may be too strong for additional post-processing by another tool. But of course the final preference and decision lies with the user.
– Standard. The results may seem to have a little too much contrast in some cases. However, manually reducing the contrast level could produce something that is close to what you are after.
– Vivid. Does not work well every time, but can yield some surprisingly pleasant results when you want something more punchy.
6. Set “Sharpen” In Picture Control
Do this in the Picture Controls panel. We recommend to only perform sharpening in the last step of post-processing as saturation and contrast adjustments can yield results that react differently to different levels of sharpness adjustment. Nowadays I set this to 1, but you can experiment and determine your own preferred levels.
7. White Balance and Exposure controls are great
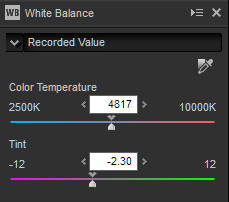
The white balance tool is easy to understand. If you ever have to adjust white balance, you will appreciate how good colour accuracy is in NX-D compared to other RAW converters, especially in mixed lighting. Make the image warmer or cooler, and watch how the colours retain authenticity and not go weird.
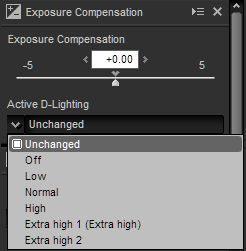
Use the Exposure Compensation tools for global exposure adjustments. The exposure slider is simple to understand. Active D-Lighting is surprisingly competent for intelligently pushing up shadows and pulling down over-bright highlights. In fact, it is so good that it should count as one of the key features of NX-D. You can get very satisfying exposure compensation results with a click of a button, and get shocked when you say to yourself, “hey that’s exactly what I wanted to do!”
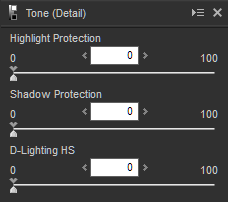
You can also tweak shadows and highlights with the details tone tool if the exposure slider and ADL controls are not sufficient to provide a satisfactory exposure histogram. Be warned that the highlight recovery tool may introduce distracting shades in your image. D-Lighting HS may clip blacks and highlights, so I avoid using that. If even these tools are insufficient, we have the next tool….
8. Use the LCH Exposure Curve tool

This adjusts brightness without affecting the colours. (Do not confuse this with the “Levels & Curves” tool – that will affect your colours!) Use this for more control beyond the simpler exposure/ADL/shadow/highlight sliders. Remember there is no need to be exact. Our aim is to just get different parts of the exposure curve adjusted well enough for us to finish it off easily in another post-processing application.
9. Consider “Colour Moire Reduction”
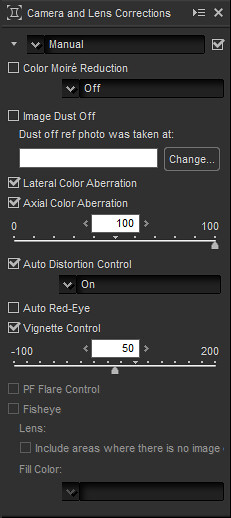
This is unchecked by default and for good reason. Selecting “Colour Moire Reduction” may remove colour moire but could actually cause details to disappear. However it is extremely effective in removing tiny colour moire noise.
Here is my recommendation. You should only consider this control option If you see faint tiny specks of colour grain at 100% magnification and they bother you. Try setting “Colour Moire Reduction” to “Low” and observe the result at 100% magnification. Toggle between “Off” and “Low” options and see if the colour grain removal is effective and if some of the important details in the image disappear. Sometimes I activate this as important details in an image are not affected. Sometimes I do not as image details I consider to be important suffers degradation.
10. Noise reduction
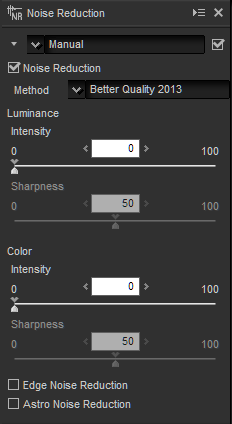
Make sure to use the latest noise reduction algorithm available. Just leave the detail sliders at 50. I spent a lot of time experimenting with this, and the default value of 50 gives the optimal balance of detail retention and noise reduction.
In the past, I felt that NX-D’s colour noise reduction is less impressive than Adobe’s and usually do not set it higher than 50. I always ended up using Adobe’s colour noise reduction tool afterwards to clean up any residual colour noise that was too challenging for NX-D. However in a recent NX-D update, the colour noise reduction tool may have been tweaked. In a few examples I was able to push it up to 90 without any visible detrimental effect to the image. Feel free to experiment with this on your own.
NX-D’s luminance noise reduction behaves in a somewhat opposite manner to how Adobe’s noise reduction works.
With Adobe’s noise reduction tool, low intensity values work on smaller noise grain with little impact on details. Increasing the luminance noise reduction strength removes larger noise grain but you end up getting that over-smoothened plastic look as the reduction strength increases.
NX-D’s noise reduction affects large noise grain first at low intensity values, and it retains details very well while doing so. You have to increase the luminance noise reduction strength to remove the smaller noise grain, and that is when you get that over-smoothened plastic look.
Yes, we can combine both solutions! First, use NX-D’s noise reduction to remove large noise grain. After exporting to TIFF for detailed editing with Lightroom/Photoshop, use Adobe’s noise reduction tool to clean up the remaining noise grain. This technique removes noise and retains details surprisingly well.
NX-D’s noise reduction works slowly, so choose luminance strength levels in increments of 10, then sit back and relax while NX-D applies the changes. DO NOT TRY TO PERFORM ANY OTHER ADJUSTMENT WHILE NOISE REDUCTION IS RUNNING, AS NX-D IS CRASH-PRONE AT THIS STAGE AND YOU MAY LOSE ALL YOUR CHANGES. I don’t push the value higher than 40, as I am uncomfortable with the increasing loss of image details beyond that.
11. Noise Reduction – Additional Topics
By default, NX-D will not clean up hot pixels. Just check the “Astro Noise Reduction” option and those dreaded pixels will disappear magically. I suspect this was left unchecked by default because it might cause problems with astro-photography.
I am still experimenting with the effect of “Edge Noise Reduction”, and will update this guide when I have a conclusive opinion about it.
12. The Final Workflow summary
So here is my workflow summary in NX-D summarised:
- Select desired picture style in Picture Controls panel. Enable Axial Colour Aberration Correction. Enable “Astro Noise Reduction” Set Sharpen to a low value such as 0 or 1.
- Tweak white balance if necessary.
- Global exposure adjustment using ADL, exposure sliders, highlight/shadow recovery sliders.
- If necessary, a little exposure tweak using the LCH exposure curve.
- Tweak Picture Control settings if required. I don’t do this all the time, as I may prefer to perform more precise tuning in another image processing application.
- Examine image at 100% and perform colour moire reduction and noise reduction if needed.
- Export to 16-bit TIFF and carry on editing in a preferred image editor. In my case Lightroom. I now have a well-corrected high-quality TIFF to work with.
The whole process could take less than 5 minutes, or 10 minutes if you are experimenting with different noise reduction values on a noisy image. Remember that you can just perform preliminary noise clean-up as described above, and perform a second round of noise-processing in Adobe’s noise reduction tool.
And that’s a wrap! – WY

Hi, thank you for the write-up.
I am experiencing the following error when I try to save out my edited RAW file to Lightroom using the Open With option:
“Some files cannot be converted because they are in an unsupported file format. Only files in a supported file format will be converted and opened.”
Strange as it may sound, I think the error message has something to do with me installing Bitdefender. Prior to that, I didn’t receive this message.
Any help/advice greatly appreciated!
LikeLike
I solved the issue, it was Bitdefender blocking Capture NX-D to save out files.
LikeLike
I use NX-D all the time for processing the raw NEF photos, and I love the way it handles them. In many cases, I don’t even need to pass a resulting TIFF on for further editing; I can just export directly to a finished JPG. However, my primary complaint about NX-D is that it does not save the sidecar files (the NEF adjustment parameters) until the application is shut down, or you switch to another file folder. That’s kind of annoying, and if I’ve made adjustments to a bunch of images it can take awhile for all the sidecars to be saved.
Do you know of any way to force the parameter files to be written out on demand, instead of only when leaving the application?
Thanks for the tips!
LikeLike
Hello Jerry, unfortunately I have reached the same conclusion as you. The fastest way I know of to force the file write is to select another folder.
LikeLike
Hello!
Could someone explain me why the last version 1.4.7 (Capture NX-D) performing so slow? Slower than 1.4.6 which was slow, too. I use a decent workstation, 2x Xeon processors, SSD drive, 48GbRam and Quadro K5000 video card. The OS is Windows 10 /64 bit.
Thanks.
LikeLiked by 1 person
Thank-you for sharing this I will make Nikon Capture NX part of my workflow. Should I change my Nikon D5500’s color space to sRGB ?
LikeLiked by 1 person
RAW files actually have no colour space. So the technical answer to your question is: it does not matter. However, the practical answer is: yes you should set it to sRGB. The reason is because you may not want to process every RAW file, and you may want a sRGB JPEG by your side when you need it. Except for professional print setup, all display and consumption of digital images default to sRGB.
LikeLiked by 1 person
Thank you for the article. I’m using Capture NX-D because I have Photoshop CS6, and I don’t want to buy Adobe’s subscription. How do you save and close a photo in NX-D? Obviously I haven’t done a whole lot in NX-D.
LikeLike
All changes you make are saved in real-time in a separate folder. Just make your edits and close NX-D when you are done. All your modifications will be intact when you re-open the file.
To export to a TIFF or JPEG, look for File -> Export under menus. There is also an export icon in the top right-hand corner.
LikeLike
Thanks so much for this article and all the comments. I’m finding them all excellent. I’m a beginner (about one year) but I’ve used a good few photo-editing programs, free and paid-for. I think NX-D comes closer to reproducing the original than any bar Lightroom – and there’s very little discernible difference between the two. I think for a beginner using a Nikon camera, NX-D is excellent. No doubt I’ll progress to something more powerful in the future, but for now NX-D does everything I need and more. Your tips in this article are helping me get the most out of it. Thanks again.
LikeLike
Thank you for feedback!
LikeLike
Hi there, I found your guide to using NX-D very helpful. I, however, have other problems – I don’t seem to be able to download full version. today I downloaded v1.4.3, but still doesn’t give me full toolbar, lot of things are grayed out (like ‘apply new settings’ at the bottom etc.). How do I get around that? It is very irritating, so I would appreciate some help. Thank you, regards, Mike. Merry Christmas and happy New Year.
LikeLike
Are you working on a NEF or JPEG?
LikeLike
Don’t know if you can help – I’ve recently downloaded Capture NX-D and just cannot access EXPOSURE CONTROL / WHITE BALANCE or PICTURE CONTROL. All are greyed out which is causing a lot of frustration. I uninstalled and re-installed but still no joy.
LikeLike
Are you working with a RAW file or a JPEG? From my memory NX-D will only perform modifications to RAW files, though that may have changed.
LikeLike
Suddenly Capture NX-D version 1.4.3 for mac does not allow me to edit .nef files.
All editing tools are greyed out.
I’ve uninstalled and reinstalled and still no go.
Anyone here have a solution.
LikeLike
After about six weeks of experimenting with NX-D, I don’t find it to be the ideal editing program, in terms of quality, that I’d hoped for. There are a lot of tools in NX-D which make it fairly easy to get the exposure and color close to where they should be for exporting into your program of choice, adding finishing touches, and saving as JPEG. At that final point, I’ve often felt very good about the edited image; but find, more often than not, that the NX-D derived picture is inferior to the previous version I did in Paint Shop Pro alone. There have been instances when NX-D has produced natural looking colors that I was unable to obtain in my primary editing program, but for me, NX-D seems destined to be a second choice.
One of the virtues of the program, the multiplicity of ways to modify an image, may in fact contribute to poor image quality if the wrong choices are made and the decisions often require splitting hairs. Should I use Neutral (picture control) or Standard, or even Landscape? Is Neutral augmented better than Standard diminished (quick adjust)? Almost any of the Picture Control versions can be made to look okay, but it may not be easy to decide which looks the best.
I have a few comments on the various NX-D menus: Exposure compensation works very well, and you really have the ability to fine tune exposure. Active D-Lighting also performs excellently, though I wonder if it sometimes detracts from image quality: I’ve noticed a kind of dullness in clouds and sky on some of my photos.
White Balance is very good: besides the pre-sets, if you click on the left or right arrows, the numbers change in increments of fifty. The dropper is another story though – it may do it’s function perfectly, but it’s often incredibly slow, especially if the image is zoomed in; also, the RGB values in the RH corner tend to disappear. If you think the white balance needs adjustment, it may be better to change (the tiff file) in the Export program.
Picture Control is really nice to have, but is also problematic for the reason I mentioned. I’ve followed the recommendation to set Sharping to zero, but I chafe a little at doing so – almost all my photos are landscapes and I don’t think that slight sharpening in Picture Control would hurt.
The Tone menu is self-explanatory. Highlight Protection (Tone – Detail menu) is apparently useless and harmful to image quality – Exposure Compensation or Active D-Lighting is better to use for somewhat over exposed images. Shadow Protection is very useful, but isn’t well named, since it lightens dark areas instead of protecting them. The D-Lighting slider is a little mysterious to me because it acts completely unlike the D-Lighting under Exposure Control: a very slight positive adjustment usually sends the histogram hard to the left.
I can’t say much about NX-D’s Noise Reduction features, because I frankly don’t understand noise reduction and don’t see much noise in my outdoor photos. I did try to use it, but without any noticeable success.
I have one suggestion, which may or may not be a good one, regarding the Active D-Lighting setting in your camera: turn it off, unless you’re shooting JPEGs or intend to edit with NX-D. I always check the histogram in bright outdoor light, to ensure a good exposure, and have found that the NEF files are often over-exposed, when opened in Paint Shop Pro, because the RAW data (histogram) doesn’t reflect the changes that Active-D has made to the in-camera histogram.
It would be interesting to hear from others who have made a comparison of NX-D photos to those edited in a different program.
LikeLike
It certainly isn’t for every body. If you have an alternative that you are very happy with, do continue using it.
But if there is something really bugging you about the rendering, you can always throw it into NX-D to give it a whirl.
LikeLike
My images when they appear in NX-D are never 100 percent clear when I view them,the photos are clear in other systems.Do you have any suggestions that could fix it.Thank You.
LikeLike
NX-D does not perform much sharpening on its preview images. The actual image’s pixels will be only displayed at 1-1 magnification. Unfortunately, I know of no way to change this.
I do not consider this overly bad – On1 Photo for example, over-sharpens the preview image, giving a user the wrong impression of image sharpness. Previous versions of Alien Skin Exposure displayed an even lower-resolution image for editing – though I am not sure if this has changed in newer versions.
Now I only check details at 1-1 magnification. The full-screen display is used for evaluating image brightness, contrast and saturation.
Hope this helps.
LikeLike
I’ve previously used NX-D occasionally when I just couldn’t get an image quite right in Paint Shop Pro, with unimpressive results, but your obvious enthusiasm is causing me to take another look.
Recently I took a couple dozen photos outdoors in good light and accidently took them at ISO 400; which isn’t terribly wrong, but when I brightened up the shadows there was a disturbing amount of noise. The foliage colors also didn’t seem quite accurate (which has often been a problem with my pictures). Out of curiosity I made a few in-camera RAW conversions, which came out unexpectedly well, with more accurate color, less shadow, and virtually no noise. I also did a conversion in NX-D which seemed not quite the same, with perhaps a little more noise, but I could be mistaken. Still, your article has given me hope that NX-D may be the direction to take. I like landscapes to look their best, but to stay close to what they were really like, and the image Paint Shop Pro (and others) presents for you to edit seems more like “Standard” in Picture Control than “Neutral”. It’s more tricky and nerveracking, to dial things like saturation and contrast down than up.
Nikon has a website for NX-D that covers some of the things you mentioned, and some additional tips for using the program which I’m finding useful.
http://imaging.nikon.com/lineup/microsite/capturenxd/
Two things I discovered were the use of the “Birds Eye” tool, which enables you to pan and zoom almost like a normal editor. Also, there is an icon in the upper right hand corner which enables you to bypass making a tiff file and open the image in another editor of your choosing, in my case Paint Shop Pro. I was supprised at how large a 16-bit tiff file is, around 135 mb! – It’s true you can just delete it after you’ve made your edits and saved the JPEG, since the data for the tiff file is saved in NX-D.
Because NX-D is so clunky, slow, and free, I had been under the impression that it was some kind of legacy program, outdated and unmaintained. This seems not the case. Thanks for your informative article and the action plan for using NX-D effectively.
LikeLiked by 1 person
Thanks for your comment. I don’t think PSP provides the best RAW converter though.
LikeLike
Yes, you’re probably right about Paint Shop Pro, but I haven’t actually used any other convertor, except AfterShot 2, which seemed quite poor. I was in the process of trying to find out what else was available, better, and affordable, when I happened to see your article about NX-D. Since NX-D is free and I already have it, I’m more than happy to have someone say it’s the best! One thing I do like about it is being able to use the “Neutral” picture setting for conversions, which provides more natural looking colors; also, based on my recent experiences, NX-D is better at minimizing noise, with photos taken at higher ISOs. I do feel that the “highlight protection” isn’t ideal – not really the same, or in any way equal to “highlight recovery” in PSP. (I’m getting better, though, in making sure my pictures aren’t overexposed.) Because PSP is comparatively fast and decent, I may continue to use it for most of my conversions and edits, except when I have an image I especially like and want the best possible image to work with.
Thanks again for your advocacy of NX-D, which has probably saved me some money and grief.
LikeLike
In Capture NX-D, when converting from RAW to jpeg, what is the disadvantage in setting the Image Quality slider all the way at 100%?
LikeLike
Disadvantage is the file gets bigger. There are articles which say that Jpeg export quality at 100% contributes very little to discernable image quality while increasing the file size. This affects all image software, and is not unique to NX-D. As most files are exported for web use, this sort of makes sense. A full-sized 640px-wide Jpeg could go up to 400KB+. If a webpage needs to load a lot of these on a personal gallery page, the speed will be slower and affect user experience.
Some services like Flickr do something really smart by performing additional compression on the images you upload using a proprietary algorithm. A 100% quality Jpeg at 800+ KB might end up being only 200+ KB when it is served to a web browser – and most people don’t even notice there is a difference. This is also why images hosted on Flickr load so fast as compared to say… 500px. There are some rare occasions where users have noticed degradation though. But it is very rare.
If you are interested to find an optimal setting, I think someone might have written a comparison article somewhere. It does not matter if it is written for Lightroom or another software. As far as I know the Jpeg export algorithms are pretty much identical.
LikeLike
Is it wise to view all images at fully uncompressed?
LikeLike
The reason images look better in Capture NX-D is because it is showing you the processed jpg! … Which is not a very good neutral starting point.
LikeLike
Not really. All RAW converters apply their own initial interpretation to an image. In NX-D I always start with the “Neutral” profile. In real-life use LR always gives a slight notch higher saturation and contrast. So one could say LR’s initial processing is even more attractive at first glance. (I still use LR to archive and manage the RAW files so I still see it works everyday.)
LikeLike
The ‘initial interpretation’ of the RAW file IS the embedded jpeg file (with or without picture controls added)… If you open an associated jpeg file next to the RAW file they will look exactly the same because they are the same… coming from the same place. The starting point is always the jpeg file plus anything you added to it in camera… RAW converters do nothing to the initial jpeg interpretation unless you turn something on before hand.
LikeLike
Not sure which setting this is?
LikeLike
Hello
very helpfull but also got some questions….
#once i adjust some parameters i don´t know how to save it(in the ViewNX2 every time before going to another picture it supose to save the changes)
#after i finish all the pictures how can i convert all the photos atonce in one specific folder
#how can remove ICC XTC/IPTC settings
#can i put a signature in every photo ?
thank you
LikeLike
Hello, this article is indeed very helpful, thank you. One thing I don’t understand whether I can use NX-D for making B and W photos. There is a Picture Control mode called “Monochrome”, but it seems it has influence on many parameters of the picture. In my case I loose highlights. On contrary to it for some reason moving Saturation to -100 doesn’t remove all the colors… Could you give some advice?
LikeLike
There are many different ways to create a B&W image. For e.g. different levels of clarity, different ways of processing each colour channel, different approach to treating the shadows and highlights.
There is no “correct way” to producing a B&W. E.g. Some prefer blue channel to be darker, others prefer it lighter. Some prefer to preserve shadow details, others prefer it hidden. Some prefer strong, bold lines. Others prefer a faded look.
Nikon’s Picture Control just gives one method out of many. It should be appealing enough to the general audience, but it won’t suffice for specific needs.
You can try experimenting with the “Active D-Lighting” setting after the monochrome conversion to see if it brings back the details you want.
If that is insufficient, that could mean the conversion scheme just hides the colour channels where your details reside. You can produce a colour TIFF from NX-D and use another B&W conversion tool to perform the conversion. E.g. there are some default B&W conversion presets in Lightroom. Of course you could skip the NX-D step if you want to! LR will just render the original colour channels differently and maybe a little less details. But you save yourself a bit of bother.
I currently generate a full-colour TIFF from NX-D, then use another software to produce a B&W that I prefer.
B&W conversion is an interesting science. That’s why companies can sell B&W conversion presets and software for quite a bit of money!
The Google Nik collection is now free! It comes with Silver Efex Pro that does B&W conversion – so give that a shot in LR. If you absolutely despise the Adobe ecosystem, there is also Exposure by Alien Skin.
I currently use RNI in Lightroom.
Have fun!
LikeLike
Oh yes, you can also change individual channels in monochrome. See this http://imaging.nikon.com/lineup/microsite/picturecontrol/adjustment/effect.htm
LikeLike
You certainly have helped. I recently became interested in DxO OpticsPro 10 and downloaded the 30-day trial version. I was very impressed with the adjustments it made to large batches of photos straight out of the box. But I balked at the $199 price. This morning I decided to see whether I really needed it. I tested several workflows, including opening Nikon NEF RAW files from the V1 and D750 cameras in Capture NX-D or DxO, and then processing them in Perfectly Clear (and also the desktop version, LUCiD) for that “3D” effect that P. Clear can achieve with its “develop each pixel separately” technology. Result: Capture NX-D, despite its rather clunky interface, produced superior “Nikon color” in every case. I found I could pretty much keep the nice Nikon colors if I ran the photos through Perfectly Clear and tweaked the exposure and color temperature. Feeling happy about saving $199 and clearing my head. Thanks again for your lucid writing (pun!) which is always enjoyable to read.
LikeLike
Hello and thank you for this very informative article! I learned quite a bit about file management and editing and really enjoyed reading it.
I do have a beef to pick with NX-D however… As you mentioned in your article, it’s not wise to use the sliders to make adjustments, but rather better to add values in increments. I agree with this. NX-D’s memory utilization is pretty bad compared to ACR and as a result screen updates take waaaay to long to occur… This is my problem, I need to use the sliders to find ‘that’ right amount of change. I do so by moving it left and right, watching the immediate changes on the screen, which gives me instantaneous feedback about what is working and what isn’t. I need to see my image changing in real time in order to properly asses the range where the photo looks best. (Using a properly calibrated monitor, of course.)
If I am forced to type in a number, then wait, then see the change produced, I find that there is too much time lag between adjustments to find the usable range, and then even harder to narrow down THAT range by moving left and right again until landing on that ‘perfect’ position… The human brain needs immediate feedback in order to narrow the search for ‘that spot’. (Visual memory is lost to quickly when typing numbers into fields).
I therefore cannot handle using NX-D for any important adjustments which require finessing my way to the ‘perfect’ values… Even ACR doesn’t allow for using the mouse scroll-wheel to move the sliders, which it should, as this is the easiest and fastest way to create a feedback loop between what’s happening on the screen and what’s happening in the brain. (NX-D allows scroll-wheel slider adjustments, but as mentioned, it’s too slow writing to screen to be of any value.)
LikeLike
Yes NX-D really lacks finesse. It won’t fit the workflow of many photographers who need to produce a lot of images quickly, or those who can’t accept it’s way of doing things.
LikeLike
Thank you for this. On a whim, I opened some Nikon NEF RAW files in Capture NX-D and was shocked by how much better they looked without any adjustments than the same files opened in Lightroom, Photo Ninja, and Photoshop CC 2015. I am really delighted to be seeing the beauty of the photos for the first time.
LikeLiked by 1 person
Glad to be of help. 🙂
LikeLike
Thank you again, Au. This tutorial has proved of great value to me. I take hundreds of photos at school events, and processing was formerly a dreaded chore. Now, with Capture NX-D and Athentech’s Perfectly Clear, my workflow is a joy – I can do 95 percent of the post with these two tools when using my Nikon camera. I recently acquired a Canon 6D full-frame camera, and thanks to your tutorial I was prepared to trust the accompanying Canon equivalent of Capture, Canon’s Digital Photo Expression, more than I would have otherwise. After a very brief first session I found I was able to get similar results with it.
LikeLiked by 1 person
Thanks. Also thanks for the tip about Canon’s software – I’ll keep that in mind if I should ever find myself using Canon.
LikeLike